Navigation Menu 
[expand all...]
[COLLAPSE ALL...]

|
Expand All
Compress All
General Description
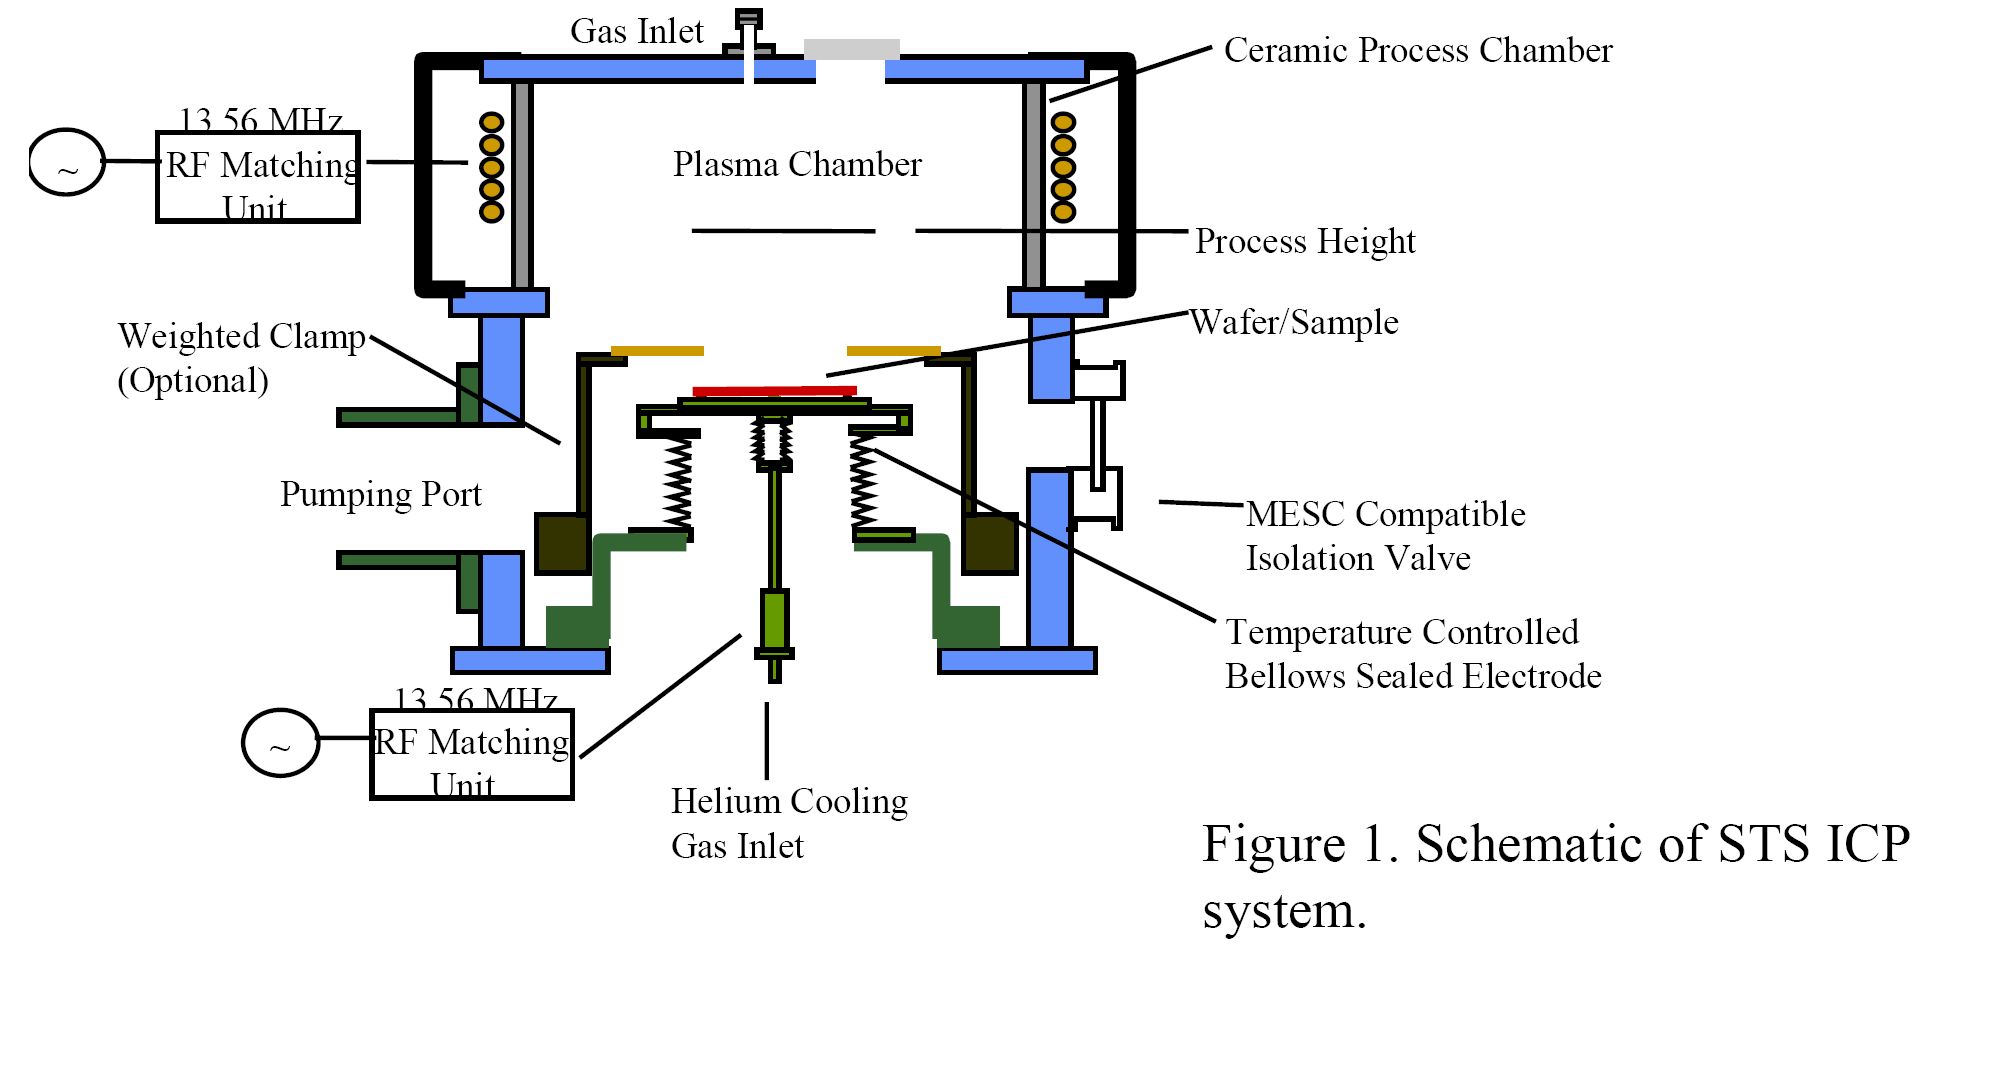
- The Inductively Coupled Plasma (ICP) Reactive Ion Etcher (RIE) provide high chemical sensitivities with high etch rate. This STS ICP System uses fluorine-based gases for anisotropic deep silicon trench etching for research and development. The 13.56 MHz RF system produces a high-density, low- pressure, low-energy inductively coupled plasma. This type of plasma allows high selectivity and aspect ratio etching for depths greater than 250 microns. The system control is via a standard PC, which automatically loads a wafer into the process chamber. Once in the chamber, the wafer is placed onto a helium-cooled chuck during the process. The system is designed to etch a 100 mm (4 in.) wafer.
- Gases and Materials:
- Argon
- C4F8
- Oxygen
- SF6
- Xenon difluoride crystals
- Inductively Coupled Plasma (ICP) Etch
- Anisotropic etch process for wide range of materials including compound semiconductors, metals, dielectrics, ferroelectrics, polymers and magnetic materials
- Etch Rate
- In order to increase etch rates of reactive ion etching (RIE), high powers are required, but this can lead to significant substrate damage.
- Substrate Damage
- To avoid this, you need a method to increase the plasma density without increasing the kinetic energy of the ion bombardment, in other words to decouple the power going into the plasma from the voltage dropped across the 'sheath' or 'dark space'.
STS ICP RIE Overview
- System Label
- Click to Enlarge

- System Diagram
- Click to Enlarge

Operation Procedure
- Startup Procedure
- Check that the RF power counsel and chiller is on.
- Check to make sure power is on the main controller
- (For Boshe Process): For Bosche etch turn on C4F8, SF6, and He(Helium) gases in the back room. The 02 should also be on, but that is usually always on.
- (For Boshe Process): Make sure main controller is set to 600 Hz.
- Processing Wafers
- Click on edit tab. Change from Operator Mode to Development mode. Password is dcv.
- Hit enter.
- Change mode to active by clicking on mode on main screen. At this point the machine will go through some steps to make sure everything is ready. Wait until you receive the ready prompt at the bottom of the screen.
- Fill in He value will need to be added when taking data. Mask is the type of photo resist or oxide layer you are using to mask the path of the RIB.
- Click on the recipe button to change or create a new recipe. SIBOSCH set is a good starting point.
- Click to Enlarge
 - With the recipe do not change first two steps.
- The third step is where you want to change your parameters
- Do not change anything in the back cooling, leak test and pressure.
- For Bosch etch make sure SF6 is set to etch and C4F8 is set to passivation. The passivation step deposits material onto wafer.
- Click to Enlarge
 - Save your recipe and close
- Click to Enlarge

- On the main console click on Vent
- Click to enlarge

- When there are no alarms and it says ready put your wafer in the holder.
- Click to enlarge

- Align flat with mark on wafer holder.
- Click to enlarge

- Click on Load button and put manual hand pressure on top lid to seal tight.
- Click to enlarge

- Following the Load step visually inspect to make sure that the clamps are holding the wafer. This might require the use of a flashlight. Also wait for status prompt to say ready.
- Click to enlarge
 - Click to enlarge

- Next click the select button and select the recipe that you want to use.
- Click to enlarge

- Wait until status prompt says ready
- Click on Process button
- Click to enlarge

- You should see some purple plasma light shining out from the box.
- Click to enlarge
 - Click to enlarge

- If you look inside to small cirle window, you should see your wafer in the center of the box
- Click to enlarge

- Following the process of etching the wafer it will pump out the gases out of the chamber. When this is done the status prompt should say ready.
- Click on unload and wafer should come out from the box
- Click to enlarge

- Following the unload step, click on vent.
- Click to enlarge

- Remove the processed wafer.
- Click on load. (We are making the machine believe that a new wafer has been loaded and unloaded so that we can keep the lid sealed) If you did have another wafer that needed to be processed it would be loaded back in at this time and you would start at step seven(the one before clicking Load button).
- Click to enlarge

- Click on unload
Shutdown Procedure
- Change mode back to inactive, by clicking on mode button and selecting inactive.
- Click to enlarge
 - Click to enlarge

- Edit tab and change back to monitor mode.
- Turn off the gases that were turned on.
Safety Information
- In case of an emergency, press the red emergency button to turn shutoff the power.
- Click to enlarge
 - Click to enlarge

Troubleshooting
- If there is any question about the STS ICP System, please email the staff on the top of the page.

|
